My exhibit is based on the book ‘The Optician of Lampedusa’, by Emma Jane Kirby, BBC European Correspondent, who also made a short documentary report for BBC Radio on which the book was based. It is published by Penguin, and was shortlisted for Waterstones book of the year 2016. I have used it with the permission of the author for this educational project, who said that she would very much like to attend the private view of the MA show. I hope that she can make it. I am also meeting her to discuss the project after she has finished covering the upcoming French elections for the BBC in mid May.
This project plan is very much a first draft, that I will use to discuss with all the parties involved, including my fellow MA Fine Art Digital students when we start to plan our MA show as a whole.
PROJECT PLAN FOR MA SHOW
KEY STEPS
- Decide on treatment, discuss with advisors, prepare script and brief actors.
- Make background video of seagulls underwater with Vuze camera, transitioning on repeat to refugees in the water.
- Make life sized sculptures of the two actors, and possibly two hands together.
- Make Hololens videos of narrators.
- Make show set up and install.
Include fall back plans for all stages
STEP 1 – Decide on treatment, prepare script, discuss with advisors and brief actors
Meeting with filming, sound and script advisors (start before 16 March when Leo, the ‘refugee’ is 3D scanned). This should include consideration of the final show set up set up in its allocated place and space available. A schedule needs to be agreed in advance.
- Filming of the sea
- 2D or 3D? 360-degree or not? Viewed using VR Headset or not?
- Sound stereo or spatial?
- Film location and time needed on location? Who makes arrangements?
- Film length?
- Who will film and sound record?
- What equipment is needed and where to source it? Who does this?
- Who will carry out post production?
- Who will set up in show location to achieve the chosen viewer experience? (TQ)
- Fall back plan: Use the existing YouTube video of seagulls only. Need to check quality when projected. Or just use the film of screeching seagulls conventionally in 2D with or without 360-degree viewing capability.
2. Filming of narrators using Hololens Mixed Reality (MR)
- What is to be narrated in general terms by each actor; did the male refugee die or survive? Interacting dialogue or separate?
- Sound stereo or spatial?
- Film location (green screen facility – UAL Wimbledon ideal)? Check availability and book it early.
- Film length?
- Who will film and sound record?
- What equipment is needed and where to source it?
- Who will carry out post production? Need to import scalable video of actors into Hololens? Possibly need to do this through Unity or Unreal Engine software.
- Do we, can we, film a spectator view for the show, where the viewer is seen in the film in real time? Need a second Hololens to do this. Can I borrow one?
- Who will set up in show location to achieve the desired viewer experience? (TQ)
- Write and issue scripts (MM)
- Brief actors, rehearse and film (MM, TQ, SQ, LW). Agree schedule in advance.
- Fall back plan: Use film of actors made against a green screen and add to film edit of seagulls/heads in the sea. Or just use actor’s sound recordings. Hololens then set aside

3. Creation of life-sized head and shoulder sculptures of the narrators
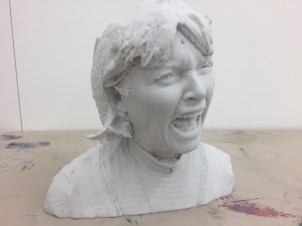
- How should Leo, as the refugee, be posed (narrating, in the sea, or in the boat? Terrified, calling in the water, reaching out to rescuers, drowning, numb or relieved in the boat? The wife of the optician is already decided (screaming first seeing refugees in the water) as work is already in progress.
- Additional scan and 3d sculpture of hands (only) holding together (black in white male or white female?) as refugee being pulled into the boat – the recurring dream image of the optician.
- Material for the scans/ Bronze for refugee, and mixed bronze (refugee hand) and aluminium cast or white 3D print (rescuer hand).
- Fall back plan: 3D print at CSM and do not attempt to create foundry bronzes.
STEP 2 – Make background video of seagulls underwater with Vuze camera, transitioning on repeat to refugees’ heads in the water
- Acquire Vuze 360-degree camera (arriving March) and learn how to use it.
- Acquire underwater kit for the Vuze camera (availability yet to be announced? – Check with Vuze) and test in a pond.
- Determine the best way to add sound (possibly spatial sound) to recordings, how to edit it, and set up in a show space.
- Determine location for filming (possibly Lampedusa, an Italian island between Italy and Tunisia) and make arrangements to go there. Need a sunny day.
- Film underwater from a boat or jetty in chosen location. Two films, one with seagulls and the other without, including sound (which should, if possible, also transition to human voices).
- Determine which software to use to create and add images of heads of drowning refugees to empty sea, and to transition between this and the film of seagulls diving. Possibly use iClone, Poser, or Daz3D stock 2D/3D animations of heads.
- Integrate film and sound, and edit. Screen rushes and use feedback to create final cut.
- Decide if going to allow the viewer to look around the 360-degree film with or without a VR headset. Kinect tracking or Jack MA show type arrangement?
STEP 3 – Make life sized sculptures of the two actors, and possibly two hands together
- The 3D scan of the wife of the optician of Lampedusa has already been 3D printed 20cm tall in plaster. This was used to visualise how to dissect the head, leaving the face intact, so that it can be 3D printed life sized in several parts (It cannot be printed in one piece due to the size of 3D printer’s maximum print dimensions). This will be printed before the end of March.
- Assemble the parts to form the life-sized bust, and finish.
- Arrangements have already been made to 3D scan Leo, the actor narrating the part of a refugee. This will take place in the Photography studio on 16 March. Need to take several scans, representing the different poses already described, and to ensure good quality results. Also need to scan hands together and apart. I will need to get someone to scan for the hand of the rescuer. As I have limited time (1 hour) I need to decide on number of scans and poses in advance.
- Take the chosen 3D scan to CSM Digital Fabrication to dissect as previously described, in order to make a full-sized head and shoulders bust of the refugee. This will provide a back-up position in case there is no time to make a bronze. The scan of each hand can be 3D printed in one piece, and joined later in a handshake pose, one hand being painted brown and the other left white in its original finish. If no time to make a foundry bronze, proceed to 3D printing at CSM, assembling and finishing at home. Otherwise proceed as follows.
- Take one part of the dissected 3D model and with advice from Becky decide where the runners and riders should go. Add these, or the beginning of these to the 3D model. Then 3D-print it 4mm thick in white PLA using the Ultimaker 2+ Extended 3D printer in the G18 studio. Extend the 3D printed runners and riders conventionally if necessary. Then encase the item in a grog mixture ready for firing and pouring bronze in the foundry. Break out the bronze from the mould, and check whether the quality of the bronze is good enough. Repeat the process with a different 3D print filament if necessary until a good quality outcome is achieved (hopefully this will be unnecessary).
- Repeat this process, 3D printing all the parts with runners and riders. Probably this should be done at my home as it will enable me to closely supervise the printing process over many days. Then assemble the whole bust and bring it to a suitable finish. Back in the plaster room with Becky’s help, pin it through one side to the other in several places to stabilise the hollow interior when the lost wax (the 3D filament) burns out in the furnace. Further prepare the finished work for the furnace as previously described. Afterwards, break out the bronze bust from the mould, and finish it to achieve the desired result.
STEP 4 – Make Hololens videos of narrators
- Understand how to make and edit a green screen video with sound (Arranged for 6 March in the Green screen room in Camberwell Digital Media).
- Understand how to do the same using Vuze camera software.
- Determine the best way to add sound (possibly spatial sound) to recordings, and how to edit it.
- Practice at Camberwell, then using the wrap around green screen facility at Wimbledon. This has been agreed in principal by staff at Wimbledon, and will involve some theatre production students.
- Rehearse and film the actors on another occasion at Wimbledon.
- Edit the green screen filming and sound.
- Export the edited film to the Hololens. Possibly using Unity or Unreal Software, and definitely with help from Sion Fletcher in the 4D suite at CSM Digital Media.
- Scale and place the narrators in Hololens mixed reality to fit the overall exhibit in the MA show space. Check the distance that the viewer using the Hololens will need to be from the background screening of the film of the seagulls and refugees in the water. This is likely to be a significant distance (three or four metres). Also the level of lighting that is needed (probably dim, not blackout, or daylight). This will affect the layout of the exhibit and its location in our allocated space at Wilson Road.
STEP 5 – Make show set up and install
- It is likely that the following space will be required:
- Low light, not blackout or full daylight
- 5 metre square, against a large wall suitable as a cinema screen
- With other exhibitors who do not mind the sound of the sea and seagulls in the background (or if the narrations are not heard through the Hololens, that too)
- Also, a large screen where the film can be back projected (similar to that used at The kiosk studio during the last low residency). Alternatively, a wall, or MDF sheets butted together and finished so the join is not evident when the film is projected. Ideally the screened image should reach the floor, and a second image be projected from the ceiling on to the floor seamlessly joining first image. I am not sure whether this will require video mapping. I need to check. The screen will need to be constructed beforehand, and assembled for the show, and taken down and disposed of afterwards.
- Additionally, if spatial or stereo sound is used, a surround sound speaker system. Otherwise two speakers and an amplifier. Ideally whatever system is used it should be hidden from view. Alternatively, the sound (both of the sea, the seagulls, and the refugees in the water, and the separate recordings of the narrators) should perhaps only be heard when the Hololens is used.
- Jonathan Kearney’s advice on show set up and likely constraints should be sought at an early stage.
